Oligo Structure and Sequence Research - Basic Concepts and Methods
General Information
The word "Oligo" is short for the word "Oligonucleotide" (Oli-go-nu-klee-o-tide), which is a small piece of DNA with relatively few (2-100 usually) nucleotide building blocks
(the A, C, G, T parts). Two examples of oligonucleotides that are about 120 nucleotides long were posted on the Oligo Main page.
All of the oligonucleotides that we used in the lab had known order, length and shape.
When we constructed the oligonucleotides, it took several tries to purify each to the point where we had a single DNA Target. Once we had purified a known Target, when we sequenced
it we could match what we knew against what the instrument showed.
In many cases the two did not match up, and when there was a difference it was always near a hairpin.
Lab Processes
DNA Amplification.
Longer oligonucleotides (length >50) are usually made by piecing together shorter oligonucleotides because the chemical synthesis of short oligonucleotides is more efficient.
You don't end up with a very high yield of the product you want when you do this, and there are a lot of side-products that you don't want.
Since we didn't have much of the Target DNA (not enough for the experiments we wanted to do), we had to do something that could make more DNA by copying the small amount that we had.
We used a process called Polymerase (Puh-lim-er-ace) Chain Reaction, PCR for short.
PCR lets us do in a tube what happens in our cells every day: DNA replication where one strand of DNA is copied, making a complement, and when you copy the complement you get back the original strand of DNA (the thing we want to sequence)
(see Figure 1). In a test-tube we use heat to separate the double-stranded DNA into two parts. The polymerase enzyme needs a small bit that is double-stranded, so we add very short oligonucleotides (15-20 nucleotides long) that match one
end of each strand. When these little pieces, called primers, bind to the DNA, the Taq (tack) polymerase protein can start making the complementary strand, using the nucleotide building blocks you also put in the reaction. If you repeat the heating and cooling steps many times you make a lot of copies
of the DNA (hence Polymerase Chain Reaction ).
Figure 1- Cartoon of how PCR works (source = http://users.ugent.be/~avierstr/principles/pcrani.html )
Gel Electrophoresis
After we had done PCR, we had to make sure our DNA was actually replicated in sufficient yield for us to use. DNA in solution is transparent to visible light (we can't see it). We used two techniques to tell us the length
and quantity of DNA we had gotten back from PCR: Gel Electrophoresis (Electro-for-ee-sis) and Ultraviolet (UV) light absorption.
Figure 2- Gel Electrophoresis cartoon. DNA migrates from the top (big pieces) to the bottom (smaller pieces), shown for one lane (lanes are parallel to each other, down the length of the gel). Source: http://www.web-books.com/MoBio/Free/Ch9C.htm.
Gel Electrophoresis is a process in which the DNA is forced to move through a gelatin-like substance (sort of like "Jell-O") using a voltage difference to make negateively charged DNA move through the gel twoard the postive electrode.
This works because after we pour the liquid gel into a mold and let it cool, it has a network of strands that form pores, in an irregular mesh. The mesh acts as a sort of obstacle course for the DNA pieces, and little pieces move faster through the gel than
large, tangled DNA fragments can. In order to see where the DNA is, we add a dye that binds to the DNA. We use a dye that emits light under ultraviolet light and only does that when it is bound to DNA.
Then we take a picture of the DNA in the gel under UV light, and by comparing the size of our DNA to a 'DNA ladder' that has known lengths, we can figure out how big our product is, and by seeing how bright it is we can figure out how much DNA we have (see picture below).
Figure 3- DNA migrates from the top (big pieces) to the bottom (smaller pieces), in lanes. The DNA ladder is in the lane farthest to the left. Ideally we would see only one band in each ot the other lanes, but in most of them we see two or more. The darkest bands are the ones we want, but we need a way to get rid of the others.
Gel Elution
The gel does a good job of separating the DNA we want from the pieces we don't want, and we can cut out the part of gel with our product using a razor blade. Unfortunately the gel material interferes with the sequencing chemistry. So to fix this, we needed to separate the DNA from the gel.
The thing about science is that not everything works the first way you try it; you need to try a couple of things before it works.
There are commercial kits in the lab that were meant to remove DNA from the gel,but our yield was terrible (basically the kits ate our sample). So Dr. Weller found a method using two tubes nested inside each other, a needle, and a slice of the gel we cut out that contained the DNA we wanted.
First you put the gel slice in water, chop it up and let the pieces shake overnight, so the DNA diffuses into the water. Then we punctured a very tiny hole in the bottom of one of the tubes(so small that water couldn't come out on its own) and placed the gel slice inside the tube and then placed the tube with the gel slice inside the bigger tube.
We then added water to the gel tube to let the DNA diffuse out of the gel slice and spun it using a Centrifuge (Sen-trih-fyooj). This machine spins at
14,000rpm (many times the force of gravity is exerted on the sample), pulling the water with the DNA in it through the minute hole at the bottom of the inner tube (see picture below), leaving the gel material behind.
With that step done, we had successfully made enough of the purified Oligos to continue with the sequencing steps in the experiment.
Figure 4- This shows one of the kits that did not work for us, but it shows some of the gel extraction steps that we used. Source: http://www.lifesciences.sourcebioscience.com/
Little did we know that during the gel electrophoresis, some of the samples had been cross-contaminated (probably when we cut the bands out of the gel).
Solving Contamination
Many studies have been conducted over the years that have used gel electrophoresis as a way to isolate particular fragments of DNA. However, one study actually showed, accidentally, that as DNA gets further and further down the gel,
it starts to fan out much like the delta of a river.
The scientists found this out when they ran non-human DNA in the lane next to Human DNA and then extracted the Human DNA from the gel to sequence. They found that one part in the human DNA sample looked rather odd and out of place.
As it would turn out, it was actually some DNA from the adjacent lane that had mixed with the human DNA.
In order to avoid using gels, they developed a method that uses paramagnetic beads to separate DNA by size instead. The beads we used are called Ampure XP beads.
AMPure beads work like this: DNA has a negatively charged phosphate backbone and in a solution with a lot of salt and polyethylene glycol (PEG) the DNA gets
crowded out of solution. It ends up on the beads, and because they are magnetic you can collect them using a magnetic held on one side of the tube. Depending on how much PEG and salt you have you can crowd out only really big DNA (with a low percent of PEG) all the way to really small DNA (with a really high percent of PEG).
So you can pick what size of DNA you want to collect on the beads and wash everything else away. Then you can use water to dissolve the DNA back off the beads, and you have the same you wanted.
Figure 5- This picture illustrates the basics of how the AMPure Beads work to separate Target from trash. From the Beckman Coulter Web site https://www.beckmancoulter.com
If you are interested in seeing an animation of AMPure XP beads being pulled to one side by a magnet, here is a short YouTube video Ampure animation
Below: the results of using AMPure beads in increasing concentrations (the 0.X on the top is the ratio of beads to solution), shown on a gel.
Figure 6. This is an image of a gel showing different sizes of DNA fragments separated with AMPure beads, from the Core-Genomics blog spot http://core-genomics.blogspot.com/2012/04/how-do-spri-beads-work.html
Sequencing
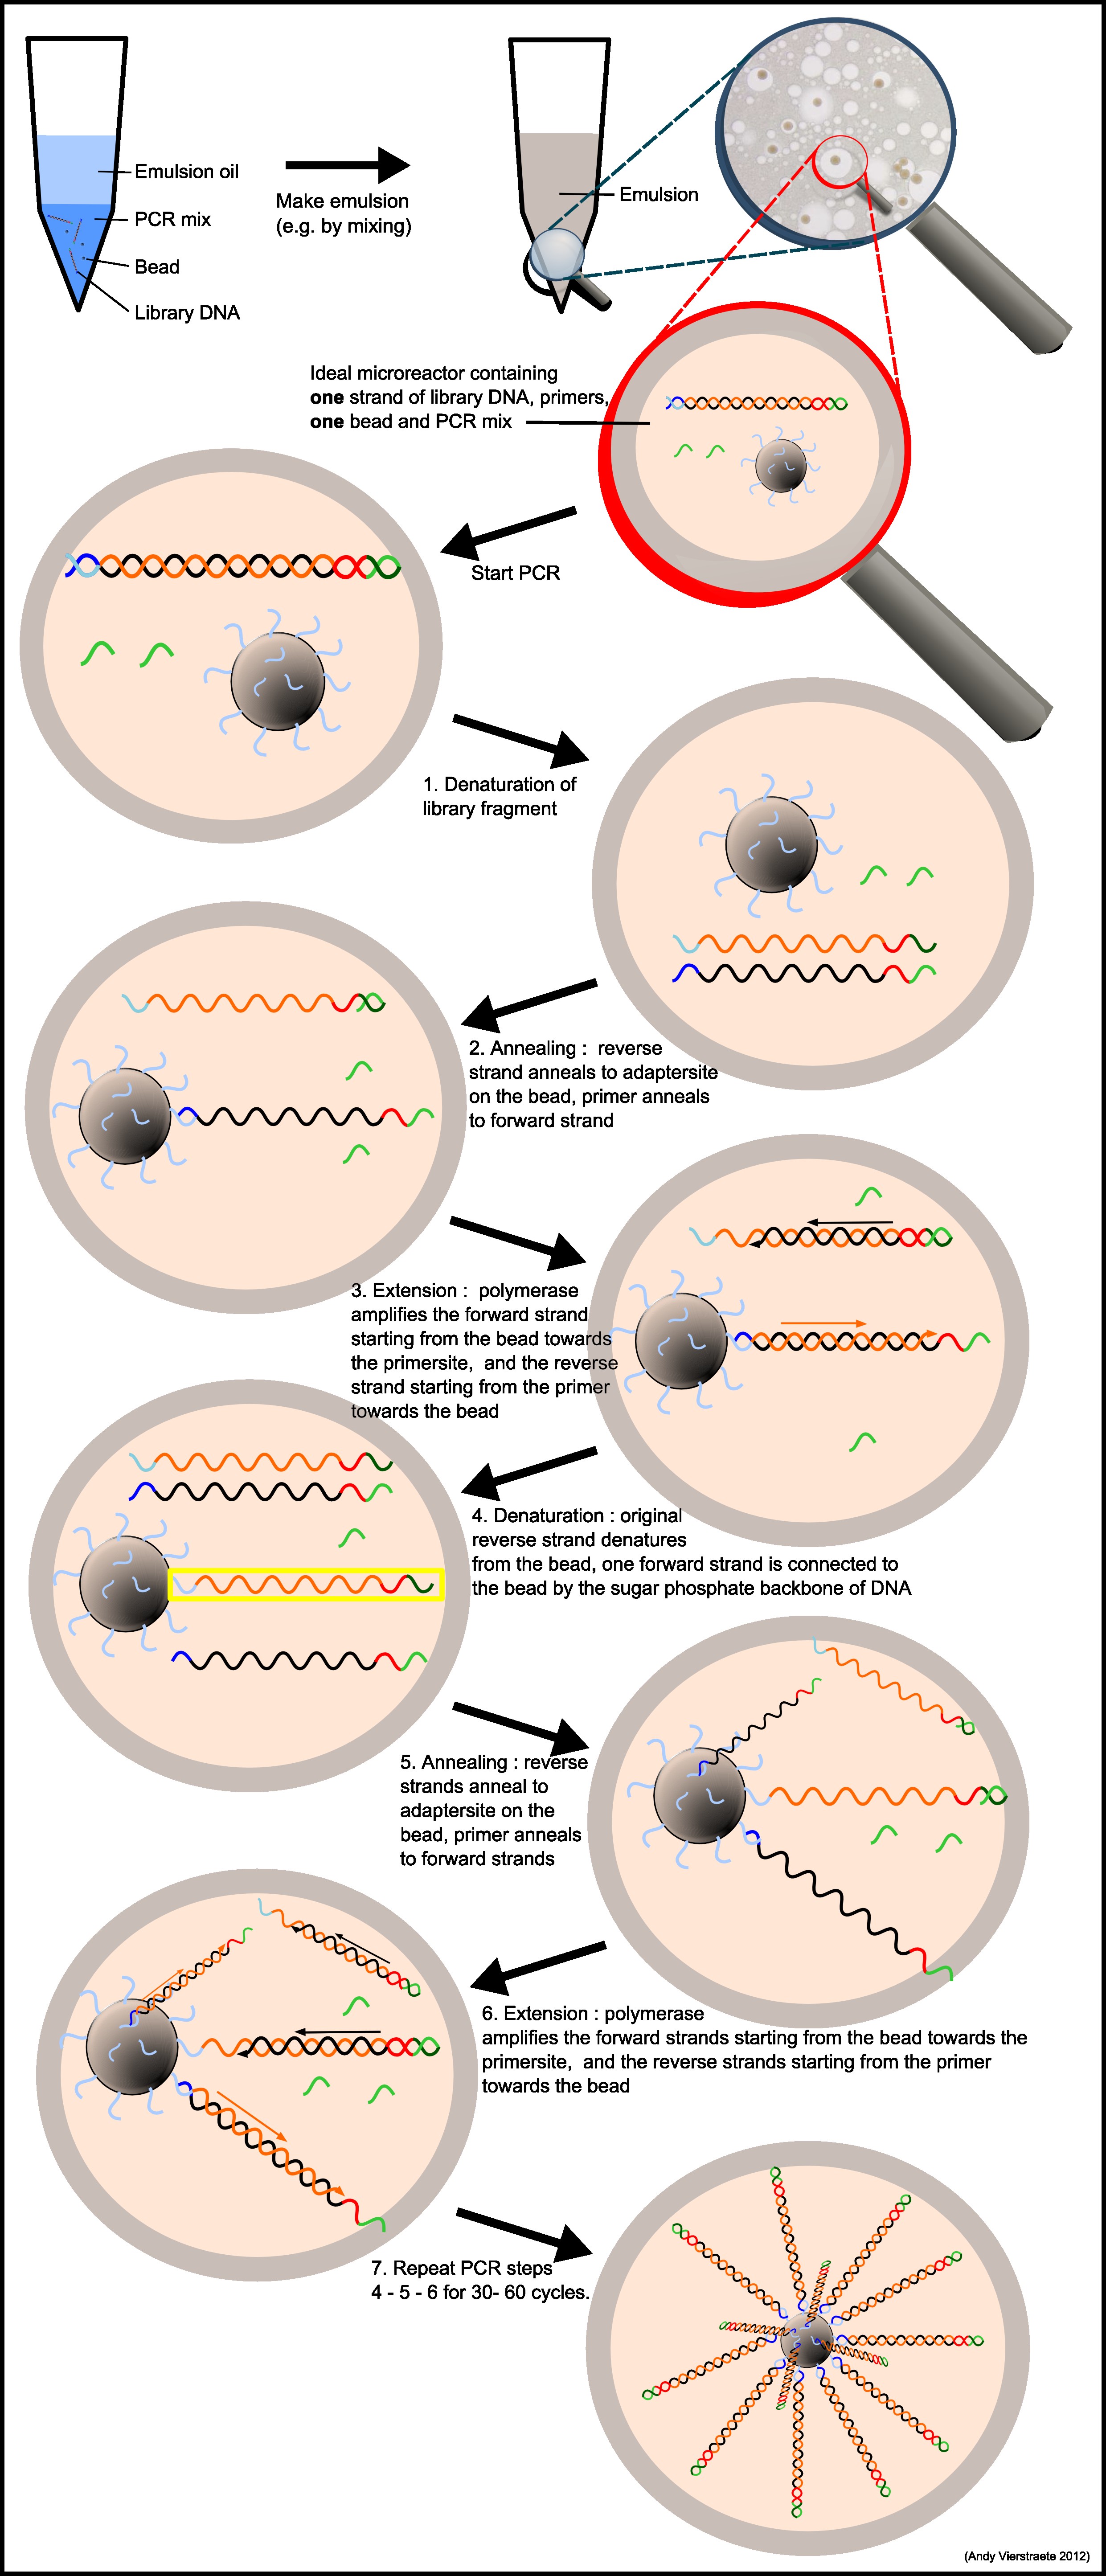
From here, we went through several steps that quantify the number of DNA fragments, then attach each individual DNA fragment to a plastic bead (ISP) and make lots of copies of that fragment on that bead (this is called emulsion PCR or emPCR), put that bead in
a well on a chip (there are 1 million wells on a 314 chip), and then sequence the DNA on all one million beads on that chip all at once.
I went through some of these steps, but Dr. Weller and one of her Graduate students, who had been working on the computational part of this experiment, did most of these steps during the week, when I couldn't come to the University.
However, Dr. Weller told me that our hypothesis was correct, all of the constructs that we had used had "missing" nucleoitides close to hairpin loops.
Some figures showing some of these steps are shown below.
Figure 7- Emulsion PCR - DNA is attached to beads, PCR makes more of the DNA. Linked from the SeqAnswers Web site to http://users.ugent.be/~avierstr/nextgen/emulsionpcr.jpg
Figures 8, 9, 10- The Ion Torrent Sequencing chip, wells on the chip where the beads sit, and the sequencer.
From (http://www.omega.si/Raziskave.html;http://www.genomics.cn/en/navigation/show_navigation?nid=4147; http://cdn.singularityhub.com/wp-content/uploads/2010/12/IonTorrent_PGM.jpg